
If you use Starlink for home internet, I recommend permanently installing the dish on your roof. Mounting Starlink on your roof gives the antenna a clear view of the sky, allowing for optimal performance. Starlink kits don’t come with a mount, so I created this guide to help you pick the one that’s best for your roof type.

In this guide, I will walk you through various Starlink roof mounting options. I’ve tested and reviewed many types of mounts, so I know what to recommend based on several factors I’ll cover in this guide. By the end you should have a good idea of what type of Starlink mount will work best for your application.Table of Contents
- Option #1: Fascia, gable, or wall mount
- Option #2: Shingle roof mount
- Option #3: Non-penetrating roof mount
- Tip: Mounting location is key
- Frequently asked questions
Option #1: Fascia, gable, or wall mount
My favorite method of mounting Starlink to a home is to use the roof fascia/gable, or even an exterior wall. The reason? It’s best to avoid putting unnecessary holes in your shingles. I’d rather secure a mount to the side of the roof as opposed to drilling through the roof.
Almost all houses have either a fascia board, gable end, or exterior wall that a mount can be attached to. To help clear trees and other obstructions, I recommend placing the mount as high up on the roof as you can, near the peak.

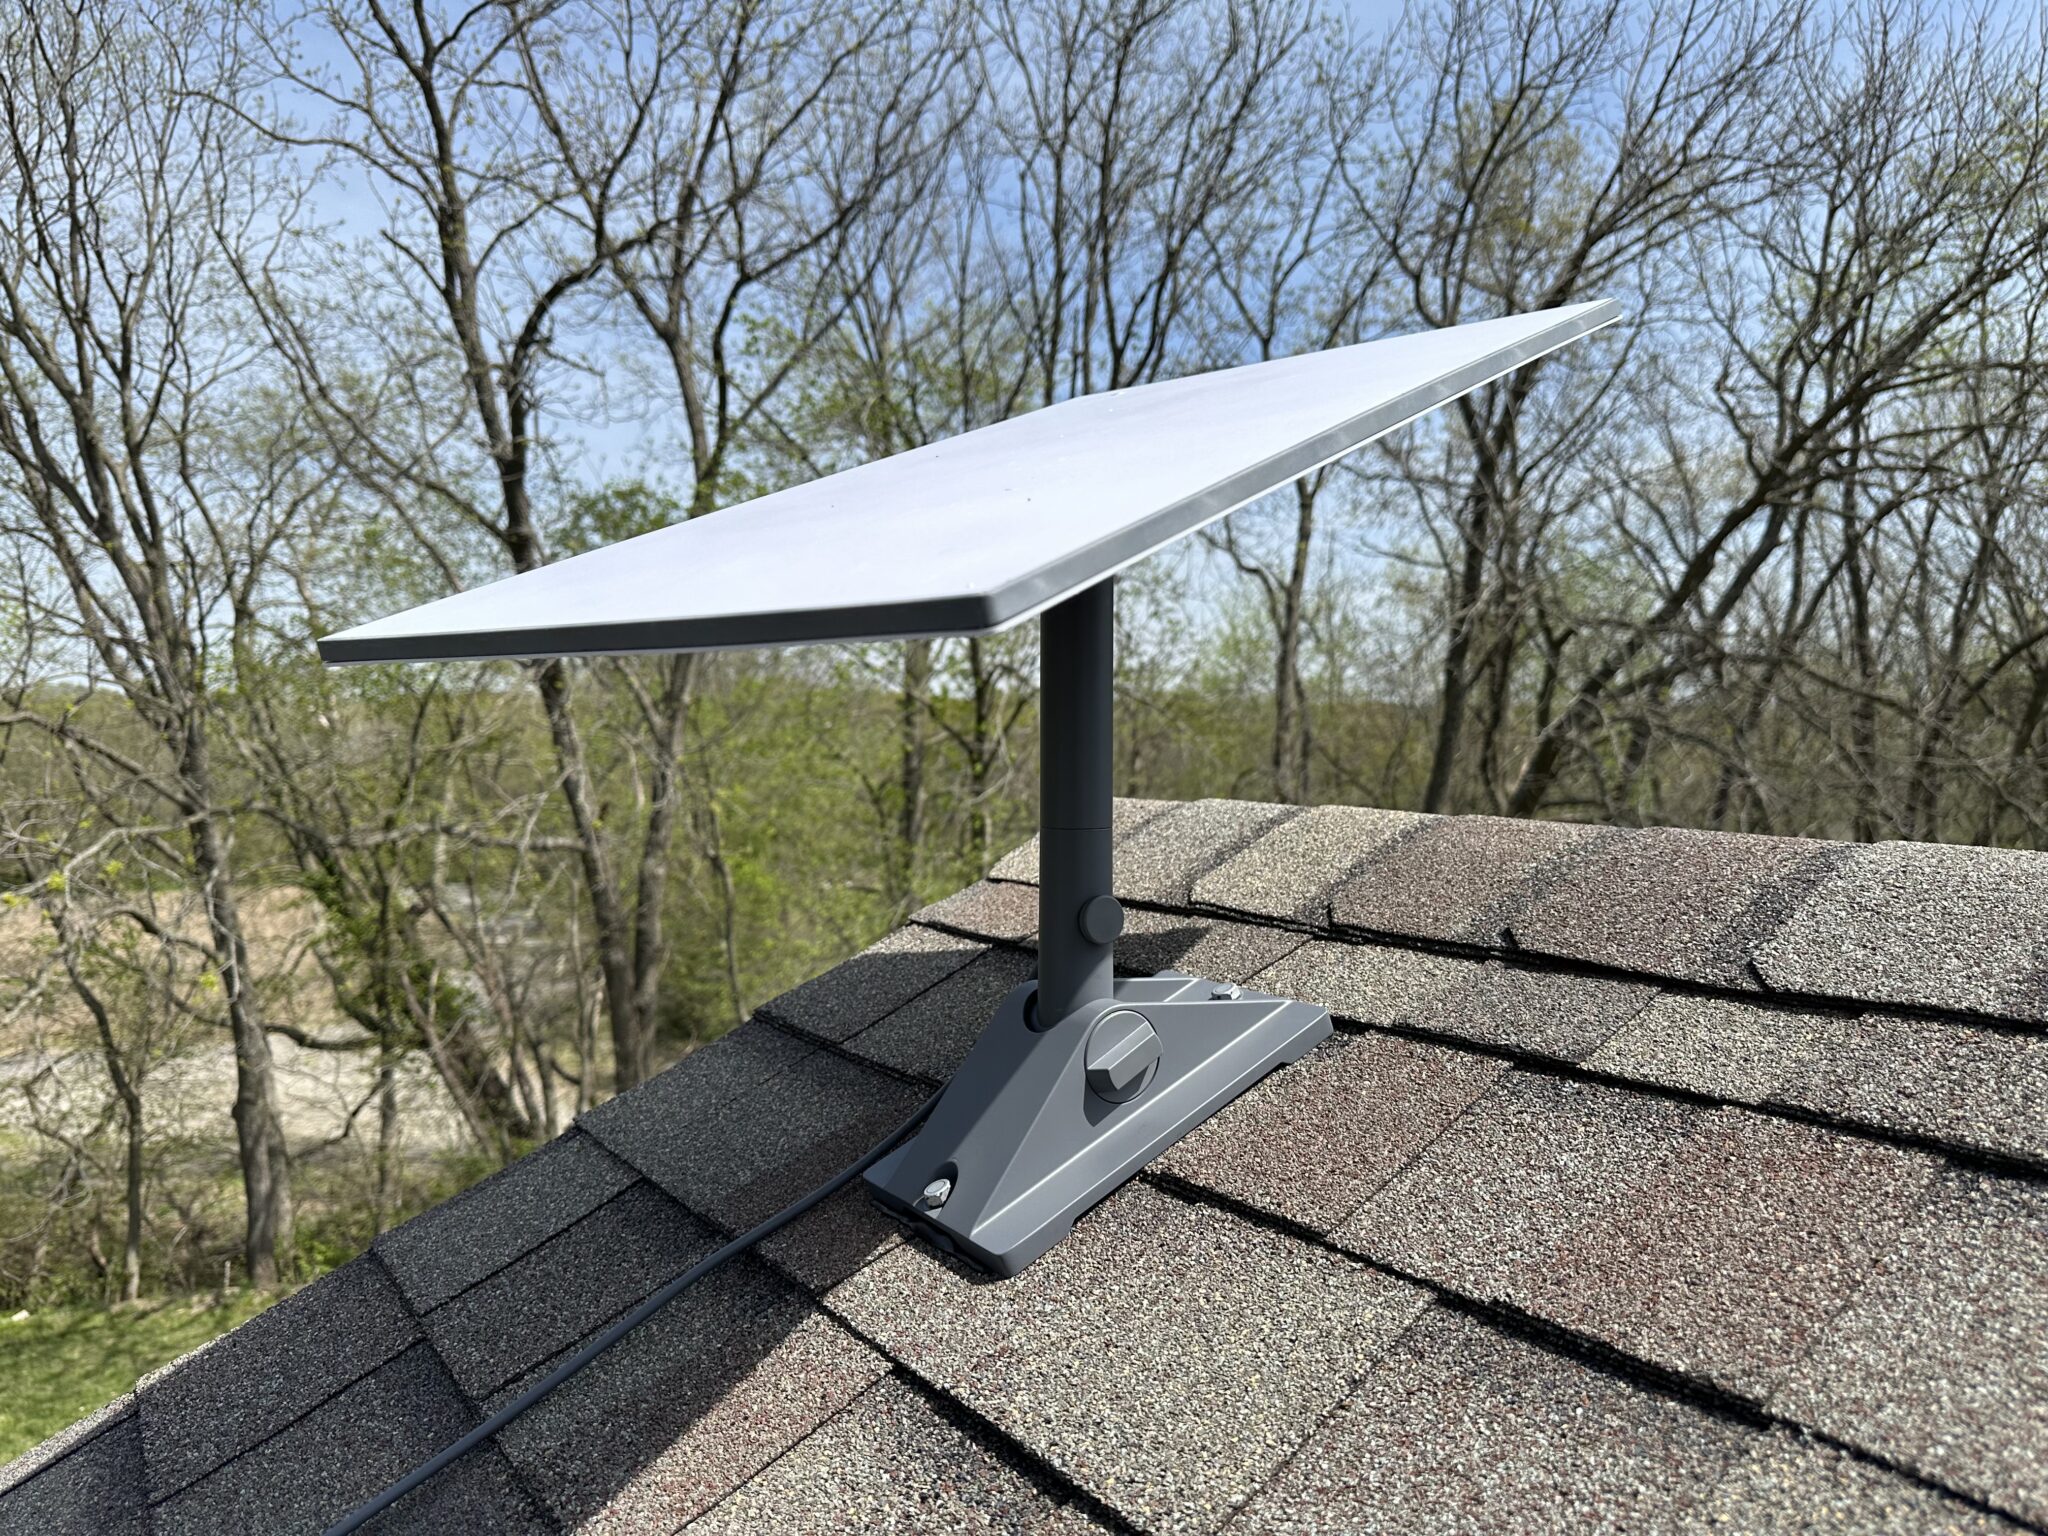
Here is my roof. I chose to secure a mount to the fascia board. Notice how I mounted my Starlink as high up as possible on the fascia, right near the peak of the roof. You can also see how easy it was to route the Starlink cable down the wall. I didn’t have drill any holes in the roof itself, just to the side of the house, where water is much less likely to leak in with proper sealing.
Starlink Wall Mount Accessory
Starlink makes an accessory called the Standard Wall Mount that is perfect for fascia/gable mounting. It’s actually what I used for my roof. It’s plug and play with Starlink, and includes all the hardware you need. Starlink makes a version for all dish models, including Gen 2, Gen 3, and the Mini.

This post may contain affiliate links. See our policy to learn more.
The Gen 3 Standard Wall Mount that I purchased was $67. You can buy it directly from Starlink, or from retailers like Home Depot.
If you’re interested in this option, I recommend checking out my Standard Wall Mount Installation Tutorial to learn all about it. I show how the wall mount is installed, and give you my review and impressions along the way.
J-mount + Pipe Adapter alternative
There are a couple of issues with Starlink’s wall mount. First, it doesn’t clear larger roof overhangs. Second, the dish doesn’t extend very high up past the roof. Depending on where you plan to install the dish, you might need additional clearance. Fortunately, you can use virtually any J-mount with Starlink.
I used to use an old satellite TV dish J-mount for my Gen 2 Actuated dish before I upgraded to Gen 3. J-mounts are extremely versatile because the mounting angle is adjustable and they come in a variety of lengths and sizes. You can mount a J-mount to the fascia, gable, wall, or even directly to the roof.
I recommend Winegard J-mounts. For example, the Winegard DS3000A has a mast length of 38 inches, perfect if you need additional height above the roof. To make a J-Mount work with Starlink, be sure to get the Pipe Adapter accessory (available at Home Depot). Starlink’s Pipe Adapter is available for all dish versions, and allows you to mount Starlink on any type of J-mount up to 2.5 inches in diameter.

Be sure to check out my Starlink Pipe Adapter Review to learn more about the accessory and how it works.
Option #2: Shingle roof mount
I personally like to avoid drilling into shingles, but that’s not to say it can’t be done properly. If the location of your gable or fascia isn’t practical, you can always mount Starlink directly to the roof. That gives you a bit more flexibility on where you can place the dish, since you’ll have virtually anywhere on the roof to pick from.
Starlink Pivot Mount Accessory
Starlink’s solution for this shingle roof mounting option is the Pivot Mount accessory, which I cover in detail in my Starlink Pivot Mount Installation Tutorial. It has an adjustable base that can be angled for virtually any roof pitch. The two included lag screws are designed to secure into the rafters, creating a solid mounting option for your Starlink dish.

The Pivot Mount costs $74 and can be purchased directly from Starlink.
I learned a few things in the process of making my tutorial. In my opinion, it’s best to place the Pivot Mount as high on the roof as you can, to clear trees and other obstructions. It’s also important to use the provided sealant tape to seal the mounting holes. I recommend checking the mount periodically, and resealing if needed to avoid water leaks in the future.
Alternative: J-mount with Starlink Pipe Adapter
Remember how I mentioned that J-mounts are extremely versatile? Not only can you use them for vertical mounting, you can also use them as an alternative to Starlink’s Pivot Mount for horizontal roof mounting. The adjustable base on a J-mount provides the same functionality as the Pivot Mount, and is installed the same way.
Before I upgraded to the newest Starlink dish, I used a Winegard DS2000A J-mount with the Starlink Pipe Adapter to mount my Gen 2 Actuated dish directly to my shingle roof. This setup worked well for years.

Option #3: Non-penetrating roof mount
Maybe all this talk about drilling and screws is too much. What if you are renting your house, or just need a semi-permanent mounting solution? I’ve got a third option for you to consider: Non-penetrating roof mounts.
A non-penetrating mount isn’t secured with bolts or screws, and there is no drilling required. Instead, this mounting option relies on ballast weights to hold the dish to your roof. Typically these mounts are installed on your roof’s ridge, but they can also be used for flat roofs.
I personally recommend Starlink’s Ridgeline Mount kit. You can check out my Gen 3 Ridgeline Mount Installation Tutorial for all the details, but it’s an all-in-one solution that includes the mount and ballast weights. It’s adjustable for any roof pitch or even flat roofs.

At $300, the Starlink Ridgeline Mount is pretty expensive compared to the other roof mounting options in this guide. You can get the Ridgeline Mount from the Starlink online shop.
There are 3rd party companies making similar mounts if the official Starlink accessory isn’t in your budget. For half the cost you can get this alternative on Amazon. You just need to provide your own weights, like concrete pavers.
Tip: Mounting location is key
No matter which roof mount option you decide to go with, it’s important to pick a good mounting location that is clear of any obstructions. Obstructions can be anything that block the view of the sky. In most cases, it will be trees that cause issues. Utility poles and other buildings could also obstruct Starlink’s view of the sky.
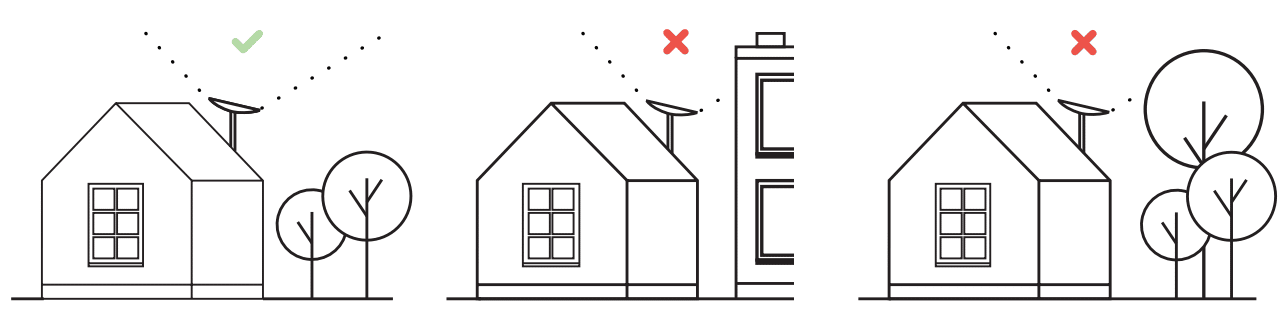
The best place to mount a Starlink dish is at the peak of your roof. You want it mounted as high as possible so that the signal won’t be impacted by trees and other obstructions. Depending on where the trees are on your property, mounting to a garage or barn roof might be an alternative to consider. Refer to my guide on extending Starlink between buildings to learn more.
How to check for obstructions
The Starlink app has a neat tool that uses your phone camera to search for potential obstructions at your desired mounting location. Stand in the area where you want to mount Starlink, open the app, and use the obstruction finder to see if Starlink has a clear view of the sky. This will give you a general idea about obstructions in that location.

Check out my post on Starlink obstructions to get more tips on how to find a good mounting location.
Frequently asked questions
Which direction does Starlink point?
This is one of the most common questions I get. The answer is that it depends on where you are located in the world. The best way to see where your Starlink will want to point is to use the Starlink app to scan for obstructions.
It’s best to mount your Starlink in a way that gives it a clear view of the sky in all directions. That way, when you do the Starlink alignment, you won’t have trees or your roof obstructing the satellite signals.
Are the mounts interchangeable between Starlink versions?
No, each generation of Starlink hardware uses different mounting systems. In general, you should purchase mounts from Starlink that are directly compatible with your dish version.
To view the Starlink accessories that are compatible with your dish, open the hardware selection page on the Starlink shop and select the correct version.
What is the wind rating of Starlink roof mounts?
It depends on the specific mount, so refer to the product specifications. For example, the Starlink Gen 3 Ridgeline Mount is rated for wind up to 50 mph
Leave a Reply