Shop
Showing 2561–2592 of 3611 resultsSorted by average rating
-
Starlink Accredited Installers In Eastleigh North
KSh 10,000.00Add to cartInstallation Process
At starlinkkenya254, we have established the industry standard when it comes to quality and durability of installation.
Our technicians follow a structured and reliable process to ensure consistent quality across all installations.
The system has been outlined in the diagram below.

1. SURVEYAssess installation site in relation to technician access, signal strength, safety, cable routes, mounting possibilities and preferred router/modem location. If there are viable installation options, our technician can liaise with you to confirm the installation and planning can begin.
2. PLANSelect optimum mount to use for the Starlink dish, and the most efficient cable route from the dish to the interior router. Devise the best positioning for the interior cable wall outlet and Starlink router prior to installation.

3. INSTALLFirmly mount the Starlink dish to the roof or wall of the building. Drill necessary holes through the roof and/or walls for the Starlink’s cable to pass through. Any exterior cable must be firmly pinned down. Feed the cable into the building and waterproof the entry holes. Cut out and install an interior wall outlet near the Starlink routers position, whereby the cable will pass through into the house’s interior.

4. SET-UPConnect the Starlink router and dish cable to the power block, then plug the power block into a power outlet inside. Download the Starlink app and follow the prompts to set up the network connection.

5. TESTRun a speed test to check the download and upload speed. Internet connection must be fast and effective before leaving the install site. Welcome to Starlink’s rapid internet connection!

Ready To Get Your Starlink Installed?
-
Starlink Accredited Installers In Eastleigh South
KSh 10,000.00Add to cartInstallation Process
At starlinkkenya254, we have established the industry standard when it comes to quality and durability of installation.
Our technicians follow a structured and reliable process to ensure consistent quality across all installations.
The system has been outlined in the diagram below.
1. SURVEYAssess installation site in relation to technician access, signal strength, safety, cable routes, mounting possibilities and preferred router/modem location. If there are viable installation options, our technician can liaise with you to confirm the installation and planning can begin.
2. PLANSelect optimum mount to use for the Starlink dish, and the most efficient cable route from the dish to the interior router. Devise the best positioning for the interior cable wall outlet and Starlink router prior to installation.
3. INSTALLFirmly mount the Starlink dish to the roof or wall of the building. Drill necessary holes through the roof and/or walls for the Starlink’s cable to pass through. Any exterior cable must be firmly pinned down. Feed the cable into the building and waterproof the entry holes. Cut out and install an interior wall outlet near the Starlink routers position, whereby the cable will pass through into the house’s interior.
4. SET-UPConnect the Starlink router and dish cable to the power block, then plug the power block into a power outlet inside. Download the Starlink app and follow the prompts to set up the network connection.
5. TESTRun a speed test to check the download and upload speed. Internet connection must be fast and effective before leaving the install site. Welcome to Starlink’s rapid internet connection!
Ready To Get Your Starlink Installed?
-
Starlink Accredited Installers In Eastleigh – Air Base
KSh 10,000.00Add to cartInstallation Process
At starlinkkenya254, we have established the industry standard when it comes to quality and durability of installation.
Our technicians follow a structured and reliable process to ensure consistent quality across all installations.
The system has been outlined in the diagram below.
1. SURVEYAssess installation site in relation to technician access, signal strength, safety, cable routes, mounting possibilities and preferred router/modem location. If there are viable installation options, our technician can liaise with you to confirm the installation and planning can begin.
2. PLANSelect optimum mount to use for the Starlink dish, and the most efficient cable route from the dish to the interior router. Devise the best positioning for the interior cable wall outlet and Starlink router prior to installation.
3. INSTALLFirmly mount the Starlink dish to the roof or wall of the building. Drill necessary holes through the roof and/or walls for the Starlink’s cable to pass through. Any exterior cable must be firmly pinned down. Feed the cable into the building and waterproof the entry holes. Cut out and install an interior wall outlet near the Starlink routers position, whereby the cable will pass through into the house’s interior.
4. SET-UPConnect the Starlink router and dish cable to the power block, then plug the power block into a power outlet inside. Download the Starlink app and follow the prompts to set up the network connection.
5. TESTRun a speed test to check the download and upload speed. Internet connection must be fast and effective before leaving the install site. Welcome to Starlink’s rapid internet connection!
Ready To Get Your Starlink Installed?
-
Starlink Accredited Installers In Embakasi
KSh 10,000.00Add to cartInstallation Process
At starlinkkenya254, we have established the industry standard when it comes to quality and durability of installation.
Our technicians follow a structured and reliable process to ensure consistent quality across all installations.
The system has been outlined in the diagram below.
1. SURVEYAssess installation site in relation to technician access, signal strength, safety, cable routes, mounting possibilities and preferred router/modem location. If there are viable installation options, our technician can liaise with you to confirm the installation and planning can begin.
2. PLANSelect optimum mount to use for the Starlink dish, and the most efficient cable route from the dish to the interior router. Devise the best positioning for the interior cable wall outlet and Starlink router prior to installation.
3. INSTALLFirmly mount the Starlink dish to the roof or wall of the building. Drill necessary holes through the roof and/or walls for the Starlink’s cable to pass through. Any exterior cable must be firmly pinned down. Feed the cable into the building and waterproof the entry holes. Cut out and install an interior wall outlet near the Starlink routers position, whereby the cable will pass through into the house’s interior.
4. SET-UPConnect the Starlink router and dish cable to the power block, then plug the power block into a power outlet inside. Download the Starlink app and follow the prompts to set up the network connection.
5. TESTRun a speed test to check the download and upload speed. Internet connection must be fast and effective before leaving the install site. Welcome to Starlink’s rapid internet connection!
Ready To Get Your Starlink Installed?
-
Starlink Accredited Installers In Embakasi – Baraka
KSh 10,000.00Add to cartInstallation Process
At starlinkkenya254, we have established the industry standard when it comes to quality and durability of installation.
Our technicians follow a structured and reliable process to ensure consistent quality across all installations.
The system has been outlined in the diagram below.
1. SURVEYAssess installation site in relation to technician access, signal strength, safety, cable routes, mounting possibilities and preferred router/modem location. If there are viable installation options, our technician can liaise with you to confirm the installation and planning can begin.
2. PLANSelect optimum mount to use for the Starlink dish, and the most efficient cable route from the dish to the interior router. Devise the best positioning for the interior cable wall outlet and Starlink router prior to installation.
3. INSTALLFirmly mount the Starlink dish to the roof or wall of the building. Drill necessary holes through the roof and/or walls for the Starlink’s cable to pass through. Any exterior cable must be firmly pinned down. Feed the cable into the building and waterproof the entry holes. Cut out and install an interior wall outlet near the Starlink routers position, whereby the cable will pass through into the house’s interior.
4. SET-UPConnect the Starlink router and dish cable to the power block, then plug the power block into a power outlet inside. Download the Starlink app and follow the prompts to set up the network connection.
5. TESTRun a speed test to check the download and upload speed. Internet connection must be fast and effective before leaving the install site. Welcome to Starlink’s rapid internet connection!
Ready To Get Your Starlink Installed?
-
Starlink Accredited Installers In Embakasi – Mowlem
KSh 10,000.00Add to cartInstallation Process
At starlinkkenya254, we have established the industry standard when it comes to quality and durability of installation.
Our technicians follow a structured and reliable process to ensure consistent quality across all installations.
The system has been outlined in the diagram below.
1. SURVEYAssess installation site in relation to technician access, signal strength, safety, cable routes, mounting possibilities and preferred router/modem location. If there are viable installation options, our technician can liaise with you to confirm the installation and planning can begin.
2. PLANSelect optimum mount to use for the Starlink dish, and the most efficient cable route from the dish to the interior router. Devise the best positioning for the interior cable wall outlet and Starlink router prior to installation.
3. INSTALLFirmly mount the Starlink dish to the roof or wall of the building. Drill necessary holes through the roof and/or walls for the Starlink’s cable to pass through. Any exterior cable must be firmly pinned down. Feed the cable into the building and waterproof the entry holes. Cut out and install an interior wall outlet near the Starlink routers position, whereby the cable will pass through into the house’s interior.
4. SET-UPConnect the Starlink router and dish cable to the power block, then plug the power block into a power outlet inside. Download the Starlink app and follow the prompts to set up the network connection.
5. TESTRun a speed test to check the download and upload speed. Internet connection must be fast and effective before leaving the install site. Welcome to Starlink’s rapid internet connection!
Ready To Get Your Starlink Installed?
-
Add to cart
Installation Process
At starlinkkenya254, we have established the industry standard when it comes to quality and durability of installation.
Our technicians follow a structured and reliable process to ensure consistent quality across all installations.
The system has been outlined in the diagram below.
1. SURVEYAssess installation site in relation to technician access, signal strength, safety, cable routes, mounting possibilities and preferred router/modem location. If there are viable installation options, our technician can liaise with you to confirm the installation and planning can begin.
2. PLANSelect optimum mount to use for the Starlink dish, and the most efficient cable route from the dish to the interior router. Devise the best positioning for the interior cable wall outlet and Starlink router prior to installation.
3. INSTALLFirmly mount the Starlink dish to the roof or wall of the building. Drill necessary holes through the roof and/or walls for the Starlink’s cable to pass through. Any exterior cable must be firmly pinned down. Feed the cable into the building and waterproof the entry holes. Cut out and install an interior wall outlet near the Starlink routers position, whereby the cable will pass through into the house’s interior.
4. SET-UPConnect the Starlink router and dish cable to the power block, then plug the power block into a power outlet inside. Download the Starlink app and follow the prompts to set up the network connection.
5. TESTRun a speed test to check the download and upload speed. Internet connection must be fast and effective before leaving the install site. Welcome to Starlink’s rapid internet connection!
Ready To Get Your Starlink Installed?
-
Starlink Accredited Installers In Everest park
KSh 10,000.00Add to cartInstallation Process
At starlinkkenya254, we have established the industry standard when it comes to quality and durability of installation.
Our technicians follow a structured and reliable process to ensure consistent quality across all installations.
The system has been outlined in the diagram below.
1. SURVEYAssess installation site in relation to technician access, signal strength, safety, cable routes, mounting possibilities and preferred router/modem location. If there are viable installation options, our technician can liaise with you to confirm the installation and planning can begin.
2. PLANSelect optimum mount to use for the Starlink dish, and the most efficient cable route from the dish to the interior router. Devise the best positioning for the interior cable wall outlet and Starlink router prior to installation.
3. INSTALLFirmly mount the Starlink dish to the roof or wall of the building. Drill necessary holes through the roof and/or walls for the Starlink’s cable to pass through. Any exterior cable must be firmly pinned down. Feed the cable into the building and waterproof the entry holes. Cut out and install an interior wall outlet near the Starlink routers position, whereby the cable will pass through into the house’s interior.
4. SET-UPConnect the Starlink router and dish cable to the power block, then plug the power block into a power outlet inside. Download the Starlink app and follow the prompts to set up the network connection.
5. TESTRun a speed test to check the download and upload speed. Internet connection must be fast and effective before leaving the install site. Welcome to Starlink’s rapid internet connection!
Ready To Get Your Starlink Installed?
-
Starlink Accredited Installers In Fedha
KSh 10,000.00Add to cartInstallation Process
At starlinkkenya254, we have established the industry standard when it comes to quality and durability of installation.
Our technicians follow a structured and reliable process to ensure consistent quality across all installations.
The system has been outlined in the diagram below.
1. SURVEYAssess installation site in relation to technician access, signal strength, safety, cable routes, mounting possibilities and preferred router/modem location. If there are viable installation options, our technician can liaise with you to confirm the installation and planning can begin.
2. PLANSelect optimum mount to use for the Starlink dish, and the most efficient cable route from the dish to the interior router. Devise the best positioning for the interior cable wall outlet and Starlink router prior to installation.
3. INSTALLFirmly mount the Starlink dish to the roof or wall of the building. Drill necessary holes through the roof and/or walls for the Starlink’s cable to pass through. Any exterior cable must be firmly pinned down. Feed the cable into the building and waterproof the entry holes. Cut out and install an interior wall outlet near the Starlink routers position, whereby the cable will pass through into the house’s interior.
4. SET-UPConnect the Starlink router and dish cable to the power block, then plug the power block into a power outlet inside. Download the Starlink app and follow the prompts to set up the network connection.
5. TESTRun a speed test to check the download and upload speed. Internet connection must be fast and effective before leaving the install site. Welcome to Starlink’s rapid internet connection!
Ready To Get Your Starlink Installed?
-
Starlink Accredited Installers In Garden Estate
KSh 10,000.00Add to cartInstallation Process
At starlinkkenya254, we have established the industry standard when it comes to quality and durability of installation.
Our technicians follow a structured and reliable process to ensure consistent quality across all installations.
The system has been outlined in the diagram below.
1. SURVEYAssess installation site in relation to technician access, signal strength, safety, cable routes, mounting possibilities and preferred router/modem location. If there are viable installation options, our technician can liaise with you to confirm the installation and planning can begin.
2. PLANSelect optimum mount to use for the Starlink dish, and the most efficient cable route from the dish to the interior router. Devise the best positioning for the interior cable wall outlet and Starlink router prior to installation.
3. INSTALLFirmly mount the Starlink dish to the roof or wall of the building. Drill necessary holes through the roof and/or walls for the Starlink’s cable to pass through. Any exterior cable must be firmly pinned down. Feed the cable into the building and waterproof the entry holes. Cut out and install an interior wall outlet near the Starlink routers position, whereby the cable will pass through into the house’s interior.
4. SET-UPConnect the Starlink router and dish cable to the power block, then plug the power block into a power outlet inside. Download the Starlink app and follow the prompts to set up the network connection.
5. TESTRun a speed test to check the download and upload speed. Internet connection must be fast and effective before leaving the install site. Welcome to Starlink’s rapid internet connection!
Ready To Get Your Starlink Installed?
-
Starlink Accredited Installers In Gigiri
KSh 10,000.00Add to cartInstallation Process
At starlinkkenya254, we have established the industry standard when it comes to quality and durability of installation.
Our technicians follow a structured and reliable process to ensure consistent quality across all installations.
The system has been outlined in the diagram below.
1. SURVEYAssess installation site in relation to technician access, signal strength, safety, cable routes, mounting possibilities and preferred router/modem location. If there are viable installation options, our technician can liaise with you to confirm the installation and planning can begin.
2. PLANSelect optimum mount to use for the Starlink dish, and the most efficient cable route from the dish to the interior router. Devise the best positioning for the interior cable wall outlet and Starlink router prior to installation.
3. INSTALLFirmly mount the Starlink dish to the roof or wall of the building. Drill necessary holes through the roof and/or walls for the Starlink’s cable to pass through. Any exterior cable must be firmly pinned down. Feed the cable into the building and waterproof the entry holes. Cut out and install an interior wall outlet near the Starlink routers position, whereby the cable will pass through into the house’s interior.
4. SET-UPConnect the Starlink router and dish cable to the power block, then plug the power block into a power outlet inside. Download the Starlink app and follow the prompts to set up the network connection.
5. TESTRun a speed test to check the download and upload speed. Internet connection must be fast and effective before leaving the install site. Welcome to Starlink’s rapid internet connection!
Ready To Get Your Starlink Installed?
-
Starlink Accredited Installers In Gikomba
KSh 10,000.00Add to cartInstallation Process
At starlinkkenya254, we have established the industry standard when it comes to quality and durability of installation.
Our technicians follow a structured and reliable process to ensure consistent quality across all installations.
The system has been outlined in the diagram below.
1. SURVEYAssess installation site in relation to technician access, signal strength, safety, cable routes, mounting possibilities and preferred router/modem location. If there are viable installation options, our technician can liaise with you to confirm the installation and planning can begin.
2. PLANSelect optimum mount to use for the Starlink dish, and the most efficient cable route from the dish to the interior router. Devise the best positioning for the interior cable wall outlet and Starlink router prior to installation.
3. INSTALLFirmly mount the Starlink dish to the roof or wall of the building. Drill necessary holes through the roof and/or walls for the Starlink’s cable to pass through. Any exterior cable must be firmly pinned down. Feed the cable into the building and waterproof the entry holes. Cut out and install an interior wall outlet near the Starlink routers position, whereby the cable will pass through into the house’s interior.
4. SET-UPConnect the Starlink router and dish cable to the power block, then plug the power block into a power outlet inside. Download the Starlink app and follow the prompts to set up the network connection.
5. TESTRun a speed test to check the download and upload speed. Internet connection must be fast and effective before leaving the install site. Welcome to Starlink’s rapid internet connection!
Ready To Get Your Starlink Installed?
-
Starlink Accredited Installers In Githurai
KSh 10,000.00Add to cartInstallation Process
At starlinkkenya254, we have established the industry standard when it comes to quality and durability of installation.
Our technicians follow a structured and reliable process to ensure consistent quality across all installations.
The system has been outlined in the diagram below.
1. SURVEYAssess installation site in relation to technician access, signal strength, safety, cable routes, mounting possibilities and preferred router/modem location. If there are viable installation options, our technician can liaise with you to confirm the installation and planning can begin.
2. PLANSelect optimum mount to use for the Starlink dish, and the most efficient cable route from the dish to the interior router. Devise the best positioning for the interior cable wall outlet and Starlink router prior to installation.
3. INSTALLFirmly mount the Starlink dish to the roof or wall of the building. Drill necessary holes through the roof and/or walls for the Starlink’s cable to pass through. Any exterior cable must be firmly pinned down. Feed the cable into the building and waterproof the entry holes. Cut out and install an interior wall outlet near the Starlink routers position, whereby the cable will pass through into the house’s interior.
4. SET-UPConnect the Starlink router and dish cable to the power block, then plug the power block into a power outlet inside. Download the Starlink app and follow the prompts to set up the network connection.
5. TESTRun a speed test to check the download and upload speed. Internet connection must be fast and effective before leaving the install site. Welcome to Starlink’s rapid internet connection!
Ready To Get Your Starlink Installed?
-
Starlink Accredited Installers In Harambee
KSh 10,000.00Add to cartInstallation Process
At starlinkkenya254, we have established the industry standard when it comes to quality and durability of installation.
Our technicians follow a structured and reliable process to ensure consistent quality across all installations.
The system has been outlined in the diagram below.
1. SURVEYAssess installation site in relation to technician access, signal strength, safety, cable routes, mounting possibilities and preferred router/modem location. If there are viable installation options, our technician can liaise with you to confirm the installation and planning can begin.
2. PLANSelect optimum mount to use for the Starlink dish, and the most efficient cable route from the dish to the interior router. Devise the best positioning for the interior cable wall outlet and Starlink router prior to installation.
3. INSTALLFirmly mount the Starlink dish to the roof or wall of the building. Drill necessary holes through the roof and/or walls for the Starlink’s cable to pass through. Any exterior cable must be firmly pinned down. Feed the cable into the building and waterproof the entry holes. Cut out and install an interior wall outlet near the Starlink routers position, whereby the cable will pass through into the house’s interior.
4. SET-UPConnect the Starlink router and dish cable to the power block, then plug the power block into a power outlet inside. Download the Starlink app and follow the prompts to set up the network connection.
5. TESTRun a speed test to check the download and upload speed. Internet connection must be fast and effective before leaving the install site. Welcome to Starlink’s rapid internet connection!
Ready To Get Your Starlink Installed?
-
Starlink Accredited Installers In Hardy
KSh 10,000.00Add to cartInstallation Process
At starlinkkenya254, we have established the industry standard when it comes to quality and durability of installation.
Our technicians follow a structured and reliable process to ensure consistent quality across all installations.
The system has been outlined in the diagram below.
1. SURVEYAssess installation site in relation to technician access, signal strength, safety, cable routes, mounting possibilities and preferred router/modem location. If there are viable installation options, our technician can liaise with you to confirm the installation and planning can begin.
2. PLANSelect optimum mount to use for the Starlink dish, and the most efficient cable route from the dish to the interior router. Devise the best positioning for the interior cable wall outlet and Starlink router prior to installation.
3. INSTALLFirmly mount the Starlink dish to the roof or wall of the building. Drill necessary holes through the roof and/or walls for the Starlink’s cable to pass through. Any exterior cable must be firmly pinned down. Feed the cable into the building and waterproof the entry holes. Cut out and install an interior wall outlet near the Starlink routers position, whereby the cable will pass through into the house’s interior.
4. SET-UPConnect the Starlink router and dish cable to the power block, then plug the power block into a power outlet inside. Download the Starlink app and follow the prompts to set up the network connection.
5. TESTRun a speed test to check the download and upload speed. Internet connection must be fast and effective before leaving the install site. Welcome to Starlink’s rapid internet connection!
Ready To Get Your Starlink Installed?
-
Starlink Accredited Installers In Highridge
KSh 10,000.00Add to cartInstallation Process
At starlinkkenya254, we have established the industry standard when it comes to quality and durability of installation.
Our technicians follow a structured and reliable process to ensure consistent quality across all installations.
The system has been outlined in the diagram below.
1. SURVEYAssess installation site in relation to technician access, signal strength, safety, cable routes, mounting possibilities and preferred router/modem location. If there are viable installation options, our technician can liaise with you to confirm the installation and planning can begin.
2. PLANSelect optimum mount to use for the Starlink dish, and the most efficient cable route from the dish to the interior router. Devise the best positioning for the interior cable wall outlet and Starlink router prior to installation.
3. INSTALLFirmly mount the Starlink dish to the roof or wall of the building. Drill necessary holes through the roof and/or walls for the Starlink’s cable to pass through. Any exterior cable must be firmly pinned down. Feed the cable into the building and waterproof the entry holes. Cut out and install an interior wall outlet near the Starlink routers position, whereby the cable will pass through into the house’s interior.
4. SET-UPConnect the Starlink router and dish cable to the power block, then plug the power block into a power outlet inside. Download the Starlink app and follow the prompts to set up the network connection.
5. TESTRun a speed test to check the download and upload speed. Internet connection must be fast and effective before leaving the install site. Welcome to Starlink’s rapid internet connection!
Ready To Get Your Starlink Installed?
-
Starlink Accredited Installers In Highrise
KSh 10,000.00Add to cartInstallation Process
At starlinkkenya254, we have established the industry standard when it comes to quality and durability of installation.
Our technicians follow a structured and reliable process to ensure consistent quality across all installations.
The system has been outlined in the diagram below.
1. SURVEYAssess installation site in relation to technician access, signal strength, safety, cable routes, mounting possibilities and preferred router/modem location. If there are viable installation options, our technician can liaise with you to confirm the installation and planning can begin.
2. PLANSelect optimum mount to use for the Starlink dish, and the most efficient cable route from the dish to the interior router. Devise the best positioning for the interior cable wall outlet and Starlink router prior to installation.
3. INSTALLFirmly mount the Starlink dish to the roof or wall of the building. Drill necessary holes through the roof and/or walls for the Starlink’s cable to pass through. Any exterior cable must be firmly pinned down. Feed the cable into the building and waterproof the entry holes. Cut out and install an interior wall outlet near the Starlink routers position, whereby the cable will pass through into the house’s interior.
4. SET-UPConnect the Starlink router and dish cable to the power block, then plug the power block into a power outlet inside. Download the Starlink app and follow the prompts to set up the network connection.
5. TESTRun a speed test to check the download and upload speed. Internet connection must be fast and effective before leaving the install site. Welcome to Starlink’s rapid internet connection!
Ready To Get Your Starlink Installed?
-

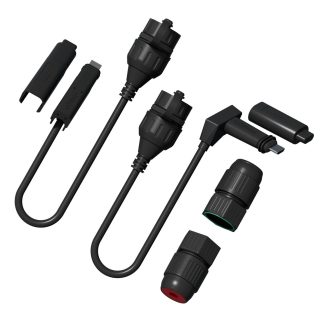
STARGEAR Gen2 SPX Starlink Ethernet Adapter
KSh 15,000.00Add to cartConvert your Gen 2 Starlink Dish with SPX connectors to PoE Ethernet
– Dish end SPX to RJ45 (Type B) Adapter
– Router end RJ45 (Type B)to SPX Adapter
– Dust and water-proof rated to IP67
– Long lasting 5-12mm dia. silicon compression glands
– Allows cable routing through small penetrations
– Supports pre-terminated CAT6a shielded patch leads
– Supports hand-terminated CAT6a shielded cabling
– Supplied with weatherproof end caps for when not connected -
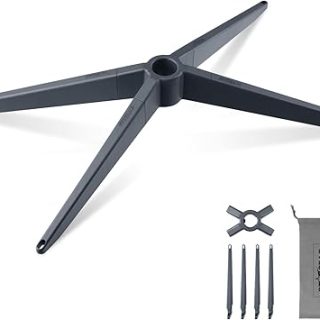
STARGEAR Gen2 Starlink Collapsible Stand
KSh 10,000.00Add to cartSTARGEAR Starlink Stand for Starlink Gen 2 Dish, Portable Lightweight Base Starlink V2 Detachable Magnetic Outdoor Ground Mount.
- Starlink gen2 stand can easily replaces the Starlink original rectangular satellite v2 base. Providing reliable support for your Starlink standard actuated dish when camping, RV, hiking, traveling.
- Starlink base mount crafted from ASA material for exceptional weather resistance, UV protection, and durability against impacts, ensuring long-lasting color and strength.
- Starlink mount with strong magnetic design enhances the installation process, ensuring a safe and convenient experience while guaranteeing stability and durability.
- Detachable Four-Legged Design enhanced convenience and portability compared to tripods; legs can be easily detached for compact storage.
- Lightweight and portable Starlink mounting kit comes complete with a convenient storage bag, making it easy to pack and carry outdoors.
-
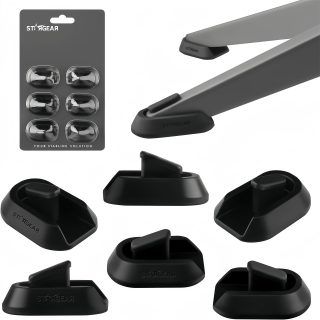
STARGEAR Gen2 Starlink Mounting Shoes
KSh 8,000.00Add to cartDesigned to suit your Gen2 Standard Actuated Starlink Dish
– allows you to easily mount on any surface without scratching
– improves stability and grip on unstable ground or hard surfaces
– protects your storage bag/box when packed away
– made from UV Stable Hi-temp Silicone
– snaps into place so not easily lost
– supplied with spares in case of damage
– minimize vibration and noise -
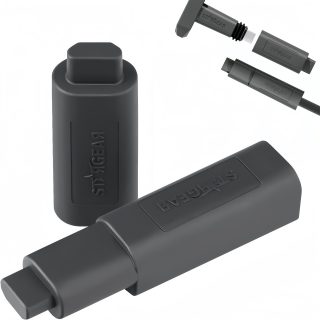
STARGEAR Gen2 Starlink SPX Cable End Caps
KSh 4,000.00Add to cartDesigned to suit your Gen 2 Standard Actuated Starlink Dish
– perfect fitment for Starlink and Stargear SPX Cables
– protect your SPX connectors whilst in storage or transit
– protects from dust, moisture and impact damage
– made from high-impact ABS plastic
– seats snugly over SPX connector seals to remain in place
– suits any SPX cable length
– minimizes maintenance and replacement costs -
 Add to cart
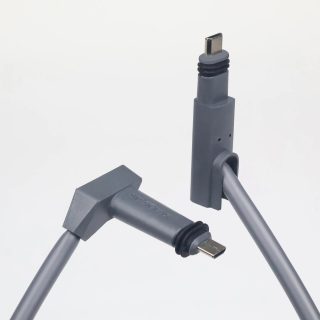
Direct Replacement Starlink Gen 2 SPX-SPX cable
– Shielded SPX Connectors as original
– Silicon seals to connectors as original
– Custom Lengths to suit your application
– Rated to 48V & Gigabit Speed -
Add to cart
Direct Replacement Starlink Gen 2 SPX-SPX cable
– Shielded SPX Connectors as original
– Silicon seals to connectors as original
– Custom Lengths to suit your application
– Rated to 48V & Gigabit Speed -
Add to cart
Direct Replacement Starlink Gen 2 SPX-SPX cable
– Shielded SPX Connectors as original
– Silicon seals to connectors as original
– Custom Lengths to suit your application
– Rated to 48V & Gigabit Speed -
Add to cart
Direct Replacement Starlink Gen 2 SPX-SPX cable
– Shielded SPX Connectors as original
– Silicon seals to connectors as original
– Custom Lengths to suit your application
– Rated to 48V & Gigabit Speed -
Add to cart
Direct Replacement Starlink Gen 2 SPX-SPX cable
– Shielded SPX Connectors as original
– Silicon seals to connectors as original
– Custom Lengths to suit your application
– Rated to 48V & Gigabit Speed -
Add to cart
Direct Replacement Starlink Gen 2 SPX-SPX cable
– Shielded SPX Connectors as original
– Silicon seals to connectors as original
– Custom Lengths to suit your application
– Rated to 48V & Gigabit Speed -
 Add to cart
Convert your Gen 2 Starlink Dish with SPX connectors to PoE Ethernet
– Dish end SPX to RJ45 (Type B) Adapter
– Router end RJ45 (Type B)to SPX Adapter
– Dust and water-proof rated to IP67
– Long lasting 5-12mm dia. silicon compression glands
– Allows cable routing through small penetrations
– Supports pre-terminated CAT6a shielded patch leads
– Supports hand-terminated CAT6a shielded cabling
– Supplied with weatherproof end caps for when not connected -
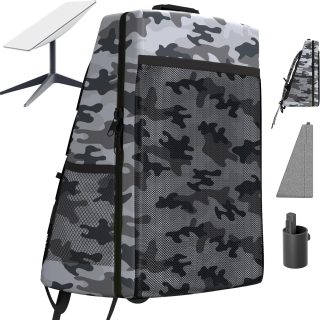
STARGEAR Gen2 Starlink Standard Actuated Travel Case
KSh 25,000.00Add to cartSTARGEAR Starlink Gen2 Travel Case, Backpack / Storage Case for V2 Standard Actuated Dish & Router
- Starlink Bag crafted from lightweight EVA material, this hard shell bag combines strength with portability, ensuring it withstands rugged outdoor conditions.
- Case for Starlink Gen 2 engineered for excellence drop resistance, providing robust protection for delicate Starlink dish and router during outdoor activities and travels.
- Starlink travel case designed with both a single shoulder strap and a convenient handle. Sling it over your shoulder for hands-free convenience or carry it by hand for quick access, ensuring comfort and ease of transportation during travel.
- Equipped with silicone dish post protective cover, safeguard the vulnerable SPX connector of the Starlink dish from bumps and dirt, extending its lifespan.
- Featuring a camouflage exterior design, the bag not only blends into outdoor surroundings but also adds a touch of style, making it an ideal companion for RV, camping, hiking, or any outdoor adventure where durability and aesthetics matter.
-
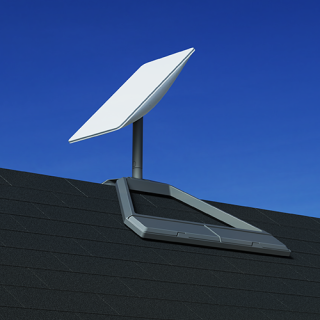
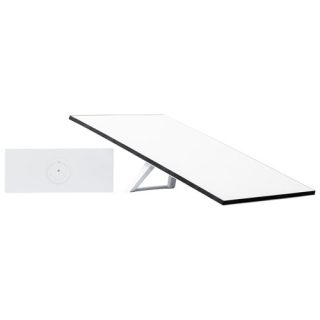
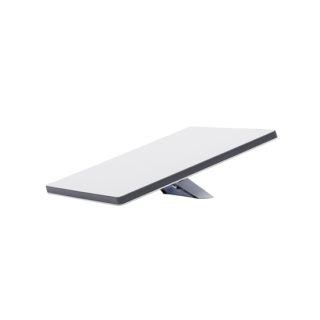
Starlink Actuated Ridgeline Mount Kit
KSh 100,000.00Add to cart*Price includes shipping and handling fees
Designed for most rooftops (roof ridgelines) and any flat surface, no drilling required. Ballast weight included with order and shipped separately.Compatibility: Standard Actuated Starlink, High Performance StarlinkTools Needed: NoneMount Package Dimensions: 29” x 24” x 3.7” / 74 x 61.4 x 9.5 cmMount Package Weight: 11.7 lbs / 5.3 kgBallast Package Dimensions: 16.7” x 4.9” x 7.4” / 42.4 x 12.4 x 18.9 cmBallast Package Weight: 55.8 lbs / 25.3 kg -

Starlink Actuated Travel Case
KSh 50,000.00Add to cart*Price includes shipping and handling fees
The Starlink team has developed the Starlink Travel Case to make it easier to transport your rectangular Starlink kit safely wherever you go. Great for RV travel, vacations, and temporary portable use.Features include a hard shell case with zipper, backpack straps, and handles on the top and side. Fits all items that came in your Starlink Kit including the router, base, and cables.Compatibility: Standard Actuated StarlinkPackage Dimensions: 25.5″ x 17″ x 13.25″ / 64.8 x 43.2 x 33.7 cmPackage Weight: 10 lbs / 4.5 kg
On Sale

Starlink Ethernet Adapter (UGANDA)
Starlink Ethernet Adapter (EGYPT)
Starlink Ethernet Adapter (TANZANIA)

Starlink Ethernet Adapter (SUDAN)
Starlink Ethernet Adapter (KENYA)